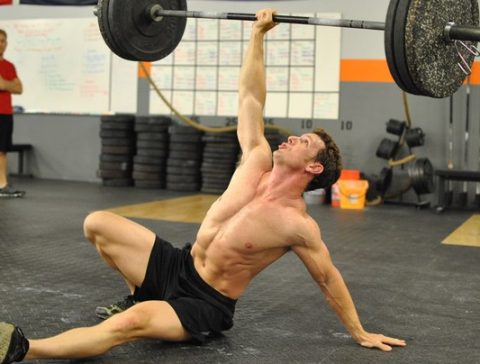
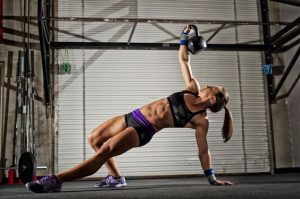
The Turkish Lift is a multifunctional exercise that develops the musculature of the whole body. In addition, the training process helps to develop coordination and balance. The Turkish Lift is widely used in kettlebell lifting and Crossfit. It requires not only initial physical training but also a certain amount of experience working with weights.
Benefits and contraindications to exercise
The main benefit of the Turkish Lift with weight is that it loads all the muscles, making all the muscle groups work in coordination. And this is for a reason: the Turkish Lift engages a whole chain of successive movements. It is necessary to rise from the lying position, extend the arm with the weight upwards, and return to the initial position. Even without weight, this task is not feasible for everyone. In addition, the Turkish Lift:
- Develops coordination of movements, allowing you to quickly rise from the lying position.
- Dynamically works out all the core muscles.
- Helps you to quickly lose weight: the energy consumption during the exercise increases due to the work of all muscles.
- The tendons become more elastic, and the joints more flexible.
- Strengthens the shoulder joints and muscles of the arms.
With regard to contraindications, people with injuries of the shoulder joint should not perform this exercise. If you don’t want to stop training, you can simply choose a lighter weight or even work without weights.
What muscles does the Turkish Lift work?
The muscles that are involved in the Turkish Lift are presented in this table:
| Part of the body | What muscles are working? |
| legs | quadriceps, leg muscles |
| press | straight, oblique muscles |
| arms | triceps and deltoid muscles of the shoulder |
| chest | large and small pectoral muscles, serratus anterior muscles |
| back | spine and pelvis in stabilization mode |
Technique
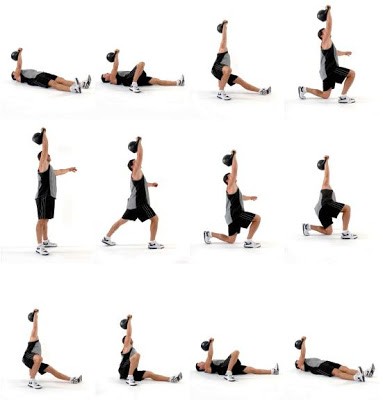
Performing a Turkish Lift is quite complex and requires many successive steps. The most common is the Turkish Lift with a kettlebell, the step-by-step instruction follows:
Step 1. Lay on the floor on your back, stretching your arms and legs. Put the kettlebell near the shoulder of the working arm. The second hand will be the supporting one.
Step 2. Turn to the side of the weight and take it by the handle with both hands. Again, lay down on your back.
Step 3. Grip the kettlebell with one hand, lower the other hand to the floor. The eyes are focused on the equipment.
Step 4. Bend the leg beside the working arm at the knee and steadily put it on the floor. With the help of the abdominal muscles, raise the elbow of the supporting arm.
Step 5. Straighten the supporting arm by crunching the body. When leaning against it and pressing the foot on the floor, stretch the body and lift the pelvis over the floor. At the same time, the working arm is still lifted upwards.
Step 6. Bend the unengaged leg and place it on the knee.
Step 7. Lift the supporting arm off the floor, shifting the weight to the legs. Raise the body vertically and get down to the floor, while standing on the knee and foot. It’s a type of lunge.
Step 8. Stand on both legs, shifting weight to the foot and stretching upward.
Step 9. With a foot opposite to the hand with the weight, make a wide step back and get down on the knee.
Step 10. When bending back on the supporting arm placed on the floor, straighten the leg that stands on the foot.
Step 11. Pull the other leg forward.
Step 12. Lower the pelvis to the floor while bending the supporting arm in the elbow.
Step 13. Lay down on the floor in the starting position, while holding the weight in a straight hand. Lower it to the floor, because we will begin a new lift.
Perform five repetitions on each side. Do two or three sets.
Common mistakes
As you might believe, a lot can go awry before you’ve hit enough reps to have the basic steps memorized and ingrained in your muscle memory.
Once you’re solid on the basics, the specific problems that hold most people back become more predictable. Here are the three most common mistakes that keep trainees from being able to progress bicep anatomy and exercises from light Turkish Lifts to heavy ones.
Mistake #1: Failing to grip the kettlebell properly
Unlike a dumbbell or barbell, the kettlebell is meant to be “over-gripped,” or pulled into what feels like slight wrist flexion. This is necessary because of the offset center of mass of the kettlebell. It “hangs” below your wrist and on the back of your forearm, meaning it’s trying to pull your wrist into hyperextension, which increases the likelihood of injury and loss of balance. Over-gripping brings the center of mass closer to the bones of your arm and makes for a stronger, safer position. Simply think about making a fist as if you were going to punch a heavy bag. Or, if you like, do 10 push-ups on your fists. You’ll find the perfect position soon enough.
Mistake #2: Bending your elbow
Apart from a hyperextended wrist, this is the most common mistake of the lift. And it’s potentially the most harmful one.
Once you allow your elbow to bend even a little bit, you’re holding the kettlebell with your musculature alone rather than taking advantage of your body’s support structure. During a properly performed lift, the weight is always well-supported by passive structures, i.e., your bones. This is why you’re able to pause and take a breath in each of the positions: you’re moving from one strong position to another.
When you bend your elbow, you destabilize the shoulder, increasing the chance of injury. Not only that, you become overly-reliant on your triceps. When your triceps fatigue — which can and does happen without warning — you might drop the bell and most likely get hurt in the process, particularly if you try to hold the lift. If you find yourself in this position, don’t try to save it. Just get out of the way and let the weight fall.
Take advantage of your body’s support structure. Keep your elbow straight.
So what’s the fix? Well, it depends on whether your problem is technique or mechanics. To be blunt, it depends on whether you’re lazy or just really tight.
Technique
If you can straighten your elbow but are just too lazy to do so, focus on pushing your fist up to the sky while simultaneously pulling your shoulder into its socket. Sometimes, achieving this is as simple as just gripping the kettlebell harder. The tighter you grip the kettlebell, the more you’ll cause your other muscles to work, through the process of muscular irradiation. Your arm will automatically straighten out, and all the joints involved in the movement will get more stable.
Mechanics
If you’re not being lazy, there’s a good chance the problem could be functional, i.e., tight biceps from doing too many curls. If this is the case, stretch your biceps between sets and only practice the stages of the lift when you can keep your elbow straight. If that means only rolling up to the elbow or hand, so be it. Partial lifts are great movements in and of themselves.
Mistake #3: Letting your shoulders droop
Soft shoulders are drooping when the head of the humerus isn’t centered in the shoulder socket. Get that humerus deep in the socket, and it will give you control of movement and protection of the shoulder joint and muscles. You need to maintain this sensation throughout the entire lift.
A little-known fact is that your shoulders are connected to your hips — each shoulder to the opposite hip — through a series of fascial slings. If you shrug one or both shoulders, the loss of tension causes you to tighten up your hips. This inhibits your ability to activate your abs when you roll up and decreases your ability to stand up powerfully in the lunge. Combined, these lapses put undue stress on vulnerable places like the knees and the lumbar spine.
How to fix drooping shoulders
How do you fix your drooping shoulders? Instead of elevating your shoulders, think about pulling your shoulder blades into your back pockets. This engages your lats, which creates a “shelf” capable of supporting the kettlebell overhead and your weight on the floor.
If this doesn’t help, then you’ll have to address your tight muscles, specifically the ones that surround your shoulder girdle: your pecs, lats, triceps, and biceps.
Other types of exercise
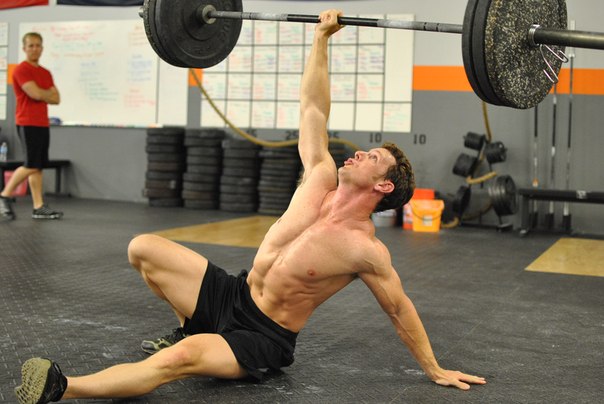
Turkish lifts can be performed with other weights besides a kettlebell. You can ease the task by choosing dumbbells or a barbell. The Turkish lift with the barbell most of all involves the muscles of the forearm and wrists. Here it is necessary not only to hold the barbell in the outstretched hand but also to make sure that none of the ends of the barbell tilt.
- The starting position is lying on the back.
- Gently take the barbell in your right hand and pull it up in front of you.
- Bend your right foot and lean against it. Slightly roll on the left thigh, lean your left hand on the floor and stretch your arm further up.
- Leaning on the right leg and left hand, gently lift off the floor. The left leg is straight. The barbell is also above the head in the straightened right hand.
- Bend your left leg under you and stand on your knee. You are now in the next position – the left knee and the right foot are on the floor, the right hand with the barbell is stretched over the head.
- Exhale and straighten.
- Carry out all movements in the reverse order to return to the starting position.
Tips for perfecting the technique
In order for the exercise to be most effective, you should adhere to the following recommendations:
- Before training, do stretches.
- When you first start performing the lift, choose small weights, and gradually increasing the load.
- If your training involves the performance of other elements, put the Turkish lift at the beginning of the workout so that the muscles are not weakened.
- Keep your hand with the weight straight all the time, do not bend it.
- In order to avoid injury to the joint, do not bend the knee at an angle of more than forty-five degrees.
- Don’t forget to breathe while performing the exercise.
- Don’t rush the movement—focus on bracing the abdominals to maintain spinal stability while moving through each step of the exercise.
- Practice the kneeling-to-standing portion with your arm extended overhead to develop a strong and stable shoulder that can support an extended arm throughout the entire movement.
- Because so many muscles are involved in the Turkish Lift, you will sweat a lot while practicing and learning the movement, so be sure to use a non-slip floor or stretch mat.
Conclusion
The Turkish lift is a unique exercise. It may seem similar to the usual lifts, but it also consists of small technical movements that collectively work on virtually all muscle groups. The advantage of this type of training is that it can be mastered without weights, by gradually moving to a truly Olympic load. And you can do all this at home and at any convenient time.
See also: Reverse grip pull-ups vs chin-ups
More from my site
 Great exercise with the kettlebell – goblet squats. Correct technique
 Reverse grip pull-ups and chin-ups
 How To Choose Testosterone Cypionate Cycle Dosage and Conduct Post Cycle Therapy
 Kettlebell Workout to Build Muscle Mass +20
 Deadlift: features and technique +20
 How to build biceps (Workouts & Exercises) +20